Operating systems do not always behave as they should and, for this reason, most of them have a “section” that can help those who use them to solve problems: this particular mode of use is called temporary mode and involves a boot ” basic “system, in which many of its functions are disabled. As you will have read in many of my tutorials, accessing this section on a PC, smartphone or tablet is not difficult: just type in some command or press a precise combination of keys and you’re done.
All perfect but, once inside, how is it possible to get out of it? It may seem like a complex affair, but, I guarantee it, it’s much simpler than it may appear at first! How do you say? Were you just looking for a guide to explain how to get out ofsafe mode without damaging anything? You are definitely in the right place: below I will explain in detail, the steps to take to get you out of this precise area of the operating system, returning to use it as usual.
Whether you’re using Windows , MacOS or Linux , or an operating system dedicated to smartphones and tablets, such as Android or iOS , the scenario does not change much: you do not have to perform complicated operations, you’ll be able to deal with them in no time, you assure you! That said, now you have nothing left to do but carve out a little ‘free time, stand in front of your computer or take your smartphone or tablet and pay attention to what I’m about to explain: without realizing it, you will abandon the safe mode and you will restore everything to normal without affecting your device.
What is temporary mode

Exactly as I mentioned earlier, the safe mode is a condition with which you can start the operating system, mainly for diagnostic or repair purposes. This is why, after booting using this approach, it is normally only possible to access certain functions of the operating system, and not use it to its full potential.
In particular, the provisional mode provides a sort of “minimum” startu , in which whole parts of the operating system can be deactivated (eg the “temporary mode” of Linux completely deactivates its graphics part), and the possibility to exploit one or more connected peripherals : this happens because, during startup, only the indispensable drivers and basic functions of the operating system itself are loaded , neglecting all the other “accessory” aspects such as, for example, programs that start automatically with the system.
In this way, it is much easier to get straight to the point in case of an unexpected malfunction and to intervene on drivers, programs or in general everything that may prevent the correct operation of the operating system. Accessing the safe mode is not difficult at all, you can see it yourself by consulting my tutorial dedicated to the topic. Getting out of it is just as simple, but not always obvious: that’s why I’m going to explain how to do it in all possible scenarios.
Exit the Windows safe mode
You’ve noticed that the fonts and icons are larger than usual, that your desktop background is all black (with one or more “Safe Mode” text appearing at the edges of the screen), and that you’re not able to use the most devices connected to the PC? Most likely you ended up in Windows Safe Mode!
You do not know how to go on? Do not worry, it takes a while to get out: all you have to do is restart the system normally! In particular, if you are using Windows 10, click on the Start button located in the lower left corner of the screen, then on the Stop button (the one with the on /off icon) and then on the Restart the system item. Alternatively, right-click on the Start button, positioned with the mouse on the item Close or disconnect and click on the Restart the system option.
As for Windows 8.1 , open the Start Screen by clicking on the Start button located at the bottom left (the flag icon), presses the button Turn off at the top right (accompanied by the shutdown icon) and choose the option Restart the system.
On Windows 7 you always have to click on the Start button at the bottom left, but then you have to click on the arrow next to the Stop system button and, in the next menu, select the item Restart the system.
How do you say? Does the computer continue to boot in safe mode? Probably the entry has been set for the permanent start in this mode: do not worry, deactivating it is not difficult at all. To proceed, press simultaneously on the Win key (the one denoted on the keyboard from the Windows flag) and on R , in the panel that appears type the command msconfig and press Enter, then click on the Options tab to start the window that appears.
At this point, remove the check mark from the Safe Mode box, presses the Apply and OK buttons and normally restarts the PC as I showed you before: you’ll see that the Windows safe mode will remain only a memory.
Exit the provisional mode of macOS
Even Macs have a “temporary mode”, which is however called secure mode: although the name is different, the goal of this particular type of system boot is identical to what I have previously explained to you for Windows systems.
To check if you are in safe mode, click on the Apple menu (the apple icon) located at the top left, then on the item About this Mac and the System report … button, select the item Software that you find in the left panel, and if in the Startup Mode you find the word Secure, then your Mac is in safe mode.
If your Mac is in safe mode, to return to normal use of the operating system, go to the Apple menu at the top left in the menu bar, click on the Restart and then click on the Restart button: the game is practically done!
If your Mac continues to boot in safe mode, or if you had previously activated this mode using the terminal, you must repeat the procedure from the terminal by slightly modifying the commands. How? Simple: open the Terminal by accessing the Other folder of the Launchpad (which you can recall from its rocket icon on the system Dock ), type the command sudo nvram boot-args = “” and press the Enter key.
When prompted, enter your user password (the one you use to log in to macOS), press the Enter key again and wait for macOS to reboot into normal mode.
Have you still not solved your problem? Also check that the keyboard Shift key is not ” jammed ” (its pressure at boot causes the boot in safe mode) and, if not, make sure to restore the area dedicated to the system settings that macOS reads at the start, also known as PRAM / NVRAM.
To proceed, turn off your Mac as usual by clicking on the Apple menu > Turn Off, then turn on the computer and press the cmd + alt + p + r keys on the keyboard simultaneously until the system reboots by itself (it will happen immediately after playback start sound). Once the restart has started, you can release the keys and wait for the system to proceed with normal boot.
How do you say? This last passage is not very clear to you? Consult without thinking about my tutorial on the restoration of NVRAM for further clarification.
Exit the safe mode of Linux
Most Linux distributions have some sort of temporary mode called, technically, recovery mode or single user mode: in this phase only the basic services of the operating system are started , the login is done in a root shell and from there it is the system can be repaired by issuing instructions from the command line.
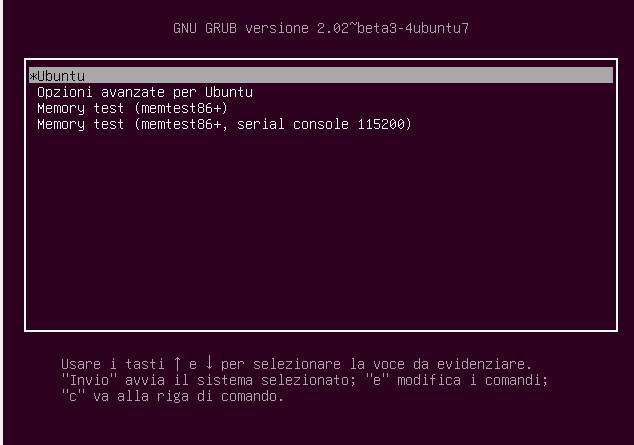
If, however, you have just happened in recovery mode and now you want to get out of it, know that there is nothing simpler: if you were still in the initial choice screen, all you have to do is press CTRL + ALT + DEL to restart the operating system in normal mode . You can also position yourself on the resume entry and press Enter twice but, in this way, it is not guaranteed to load the entire set of drivers.
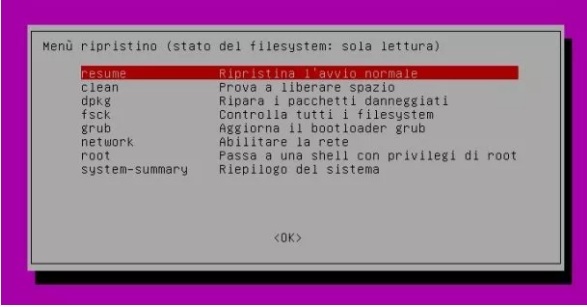 If instead you are inside the shell and you have completed the repair operations, simply type the reboot command followed by pressing the Enter key to restart the operating system normally.
Wait, are you telling me that Linux keeps entering the recovery menu? You’ve probably set GRUB to remember the last boot option: to remedy this, turn off the PC, turn it on again, then immediately press the Shift key and hold it down until the GRUB boot menu appears.
Exit the temporary mode of Android
Exiting the Android Safe Mode (also known as Safe Mode) is really simple: all you have to do is press and hold the Power button (which is on top or side, depending on your device) and then tap on off button that appears on the screen
Now, when the device is completely off, press the Power button again to turn it on: in this way you should have exited the safe mode. If not, turn your device off again and then turn it on again by pressing and holding the Power and Volume Down keys together : when the device is running, release the keys and verify that the safe mode has been disabled (it will no longer be reported on the Home screen and all apps will be back to work).
How do you say? Although you have followed the above procedure, will your device continue to reboot into safe mode? Most likely, some corrupt app prevents it from starting properly. At this point, what I advise you to do is uninstall the latest apps installed before your device started behaving strangely: to proceed, do a long tap on the app icon that you suspect to be problematic, drag it to the Uninstall button which appears at the top and, finally, presses OK.
Exit the iOS safe mode
Entering the “safe mode” of iOS is not easy and, if you find yourself, you’ve probably already jailbreaked or a particular type of software recovery. This type of startup of the iPhone or iPad is called DFU , is only feasible when the device is connected to iTunes via a Lightning cable (or Dock) and is used, in fact, for the most delicate operations of recovery (in case the other solutions do not work) or for special operations such as removing the jailbreak .
The problem is that an iPhone / iPad in DFU mode shows a completely black screen, a bit ‘as if the device was “dead” and detectable only from iTunes. Do not worry, everything is perfectly normal, and you can easily exit the DFU mode: just know, literally, the right keys to press!
So to restore the “normal” start of the iPhone / iPad and exit this “temporary mode”, given that the device is still connected to the computer and iTunes , you just have to press and hold for a few seconds the Power button (the power button) and the Home button (the one you use to turn the volume down) for about twenty seconds, at least until the Apple logo appears on the screen .
If you were in possession of iPhone 7 or 7 Plus, not equipped with a physical Home button, you must instead press the Power and Volume keys –(the one you use to lower the volume of music or phone). If you have an iPhone 8/8 Plus or iPhone X , you must quickly press and release the Volume + key, quickly press and release the Volume key – and hold down the right side key until you see the apple logo appear on the display .
You tried and tried again, but you just can not get out of DFU mode? In all probability you need to completely restore your device: bearing in mind that this operation involves the total loss of data (at least if you do not have a backup to restore later), from the iTunes screen click on the OK and Restore iPhone button , then again on Restore (or Restore and Update , if you have to do a progression of the operating system at the same time). However, I recommend you take a look at my guide on how to restore iPhone for more information about it.